Some cool effect I always loved is the flip transition between two UIViews. On this tutorial you will learn how to do it in a very straightforward way. For this tutorial I’ll assume you are used to work with UIViews, Xcode, etc.
First of all, this is a video of what you’ll get at the end.
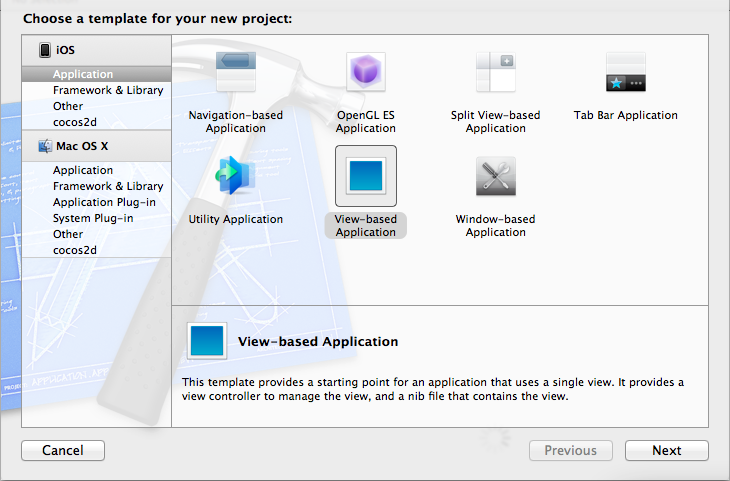
Start by creating a new project on Xcode as a new “View based application” and name it “FlipViewTutorial”.
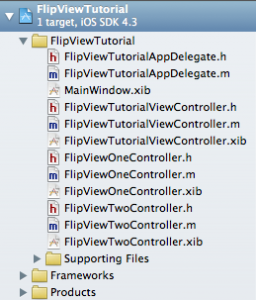
Next, we’ll add to it two new UIViewController subclasses. Let’s call them FlipViewOneController and FlipViewTwoController as subclasses of UIViewController.
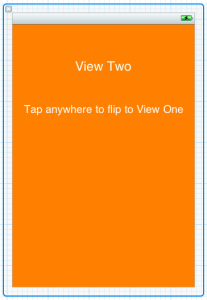
Decorate the views by adding some background colors and text to identify each view in the transition process.This is what I’ve created for this tutorial.
 |
 |
Right now, your files tree should look like the following one
Once you’ve created the views, we’ll add the transition between them in respond to a Tap over each view. We’ll configure the main controller “FlipViewTutorialViewController” as the delegate and transition manager. Start by editing the file “FlipViewTutorialViewController.h“:
[cce lang=”objc”]
#import <UIKit/UIKit.h>
#import “FlipViewOneController.h”
#import “FlipViewTwoController.h”
@interface FlipViewTutorialViewController : UIViewController {
BOOL viewOneVisible;
FlipViewOneController *flipViewOneController;
FlipViewTwoController *flipViewTwoController;
}
@property (nonatomic, retain) FlipViewOneController *flipViewOneController;
@property (nonatomic, retain) FlipViewTwoController *flipViewTwoController;
// Method to flip views
– (void) flipViews;
@end
[/cce]
As you can see, we are adding two properties for the views and a boolean property to register which view is visible at any moment. Now open the implementation file (“FlipViewTutorialViewController.m”) to create the flip transition between the two view controllers by adding the following code. This is the bigger code snippet, but don’t worry, as you will see it’s very straightforward.
[cce lang=”objc”]
#import “FlipViewTutorialViewController.h”
#import “FlipViewOneController.h”
#import “FlipViewTwoController.h”
@implementation FlipViewTutorialViewController
@synthesize flipViewOneController, flipViewTwoController;
– (void) flipViews {
// disable user interaction during the flip
self.view.userInteractionEnabled = NO;
// setup the animation group and creates it
[UIView beginAnimations:nil context:nil];
[UIView setAnimationDuration:0.75];
[UIView setAnimationDelegate:self];
[UIView setAnimationDidStopSelector:@selector(flipViewsAnimationStop:finished:context:)];
if (viewOneVisible){
// If view one is visible, hides it and add the new one with the “Flip” style transition
[UIView setAnimationTransition:UIViewAnimationTransitionFlipFromRight forView:self.view cache:YES];
[self.flipViewOneController.view removeFromSuperview];
[self.view addSubview:flipViewTwoController.view];
} else {
// If the view two is visible, hides it and display the one with the “Flip” transition.
[UIView setAnimationTransition:UIViewAnimationTransitionFlipFromLeft forView:self.view cache:YES];
[self.view addSubview:self.flipViewOneController.view];
[self.flipViewTwoController.view removeFromSuperview];
}
// Commit animations to show the effect
[UIView commitAnimations];
// Register the current visible view
viewOneVisible = !viewOneVisible;
}
– (void)flipViewsAnimationStop:(NSString *)animationID finished:(NSNumber *)finished context:(void *)context {
self.view.userInteractionEnabled = YES;
}
// Implement viewDidLoad to do additional setup after loading the view, typically from a nib.
– (void)viewDidLoad
{
[super viewDidLoad];
// Creates the instance of each controller
self.flipViewOneController = [[FlipViewOneController alloc] initWithNibName:@”FlipViewOneController” bundle:[NSBundle mainBundle]];
self.flipViewTwoController = [[FlipViewTwoController alloc] initWithNibName:@”FlipViewTwoController” bundle:[NSBundle mainBundle]];
// Assign the controller instance
self.flipViewOneController.controller = self;
self.flipViewTwoController.controller = self;
// Load and show the view one by default
viewOneVisible = YES;
[self.view addSubview:self.flipViewOneController.view];
}
– (void) dealloc {
[super dealloc];
[self.flipViewOneController release];
[self.flipViewTwoController release];
}
[/cce]
The “viewDidLoad” method, as you know, is invoked when the view has completely been loaded. At this moment, we create the instances of both views and, at the end, we show the View One and check it as visible.
The method “flipViews” will be invoked by the child view controllers: FlipViewOneController and FlipViewTwoController. As you can see, it first starts the animation cycle with a 0.75 seconds duration and disables the user interaction. Then, depending on the visible view, we just remove the visible one and show the other one using the “FlipAnimation” transition style.
We finally commit the animations and mark the corresponding view as visible. When the animation stops, the method we registered as delegate will be invoked to reenable the user interaction.
The next and final step will consist on changing the child views to invoke the previous methods when the user taps on the screen.
We’ll implement just the “touches ended“. If you want to learn more about this you can read the Apple documentation
Edit the file FlipViewOneController.h and make it look like the following snippet.
[cce lang=”objc”]
#import <UIKit/UIKit.h>
@class FlipViewTutorialViewController;
@interface FlipViewOneController : UIViewController {
FlipViewTutorialViewController *controller;
}
@property (nonatomic, assign) FlipViewTutorialViewController *controller;
@end
[/cce]
The previous lines of code add a property to store a reference to the main controller that will operate the transition between views. We’ll notify this controller when the user taps on this view to start the transition. As you can see, we’ve used @class annotation instead #import. We need to do this in order to erase the compilation errors XCode shows when there are double imports.
Next, open the implementation file FlipViewOneController.m to syntethize the previous property and add some lines of code below the @implementation annotation to look like this:
[cce lang=”objc”]
#import “FlipViewOneController.h”
#import “FlipViewTutorialViewController.h”
@implementation FlipViewOneController
@synthesize controller;
– (void) touchesBegan:(NSSet *)touches withEvent:(UIEvent *)event {
[controller flipViews];
}
[/cce]
Now you just need to do the same to the FlipViewTwoController to finish the process and run the app on your simulator / iphone to see the result.
Hope you liked the tutorial! Feel free to leave your suggestions and comments. And for those of you lazy programmers :), you can also download a project created with the 4.3 SDK with the full working example.
Download full source code: FlipViewTutorial


Thanks for your easy to understand tutorial!
This will not work on iOS 7/Xcode 5. Have you updated your tutorial?